

We’ve been playing with our hair almost as long as the human race has been around, and we’ve used some wacky methods to color, style, and dress our hair. The tradition in schools of “crazy hair day” alone attests to that. The earliest evidence of using something like a hairpin to style hair comes from the Venus Figurines–prehistoric ivory statues depicting a female form–the oldest of which, the Venus of Hohle Fels, dates back to at least 35,000 years ago in present-day Germany. Hair ties are likely just as old, if not older.
Today, hair ornamentation is running wild. We’ve got hair clips and combs, sticks and picks, barrettes, ponytail covers, and beads and cuffs for locs and braids. How do you use them all? Rather, how do you make them? In this article, we’ll be discussing how to craft a number of popular hair ornaments using our tools. There are more ways to style hair than we have time to write about, but we’ll try our best.
Barrettes & Clips
A barrette, also called a hair clip or hair slide, is a hair ornament with a foldable clasp used to hold bunches of hair in place. Their size and style often depends on how much hair they’re meant to secure–some hold back front hair pieces, hold bangs to the side, some hold whole ponytails or buns in place, and others are purely decorative.
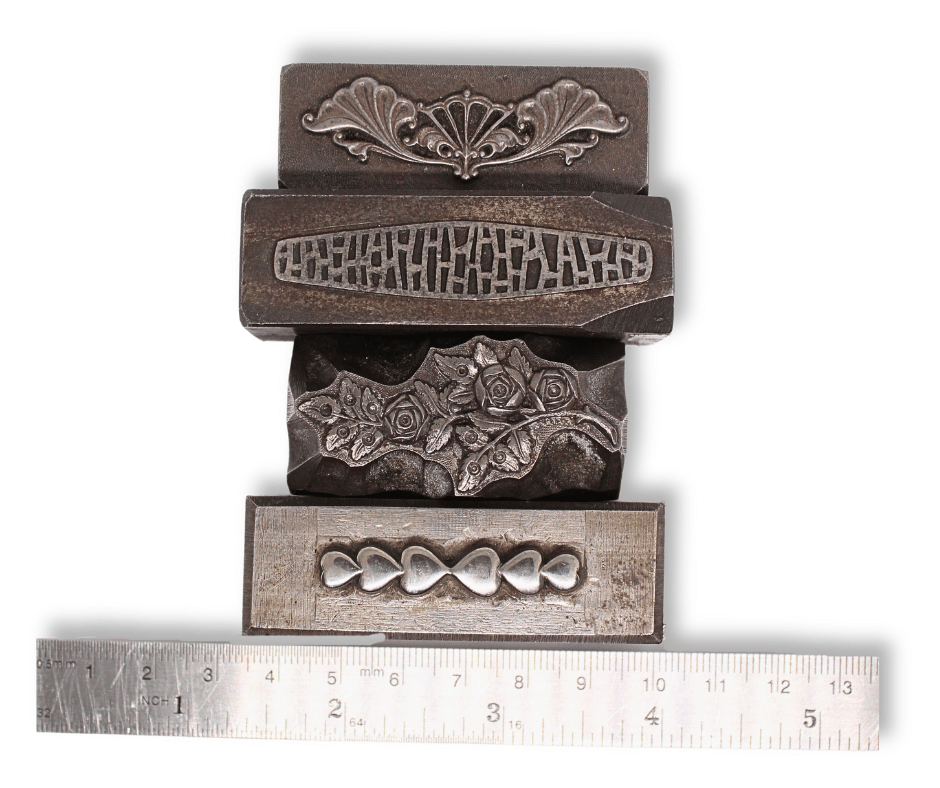
Barrettes can vary in size considerably, usually in the range of 1-½” to 4-½” long depending on their purpose and how much hair they’re meant to hold. It’s simple: the longer the clip, the more hair it can pin in place. If you’re looking to make something that can pin a head of thick, curly hair back, you’ll be wanting a long clip. Ornamental barrettes don't need to secure as much hair and can therefore be much smaller. Collecting antique jewelry hubs, we’ve found hundreds of designs that were made as beauty pins, accessory pins, and brooches.
Loc/Hair Beads & Cuffs
Braided and dreadlock hairstyles are known to be present in African, African American, Indigenous American, Indigenous Australian, and Hindu cultures and the Rastafarian movement. Throughout the 20th century, more and more people began to incorporate beads into their hairstyles. Since we focus on jewelry and are far from experts on significant hairstyles, but you can learn more about the subject by watching the videos sourced at the end of this article!
Hair beads tend to be 5mm to 10mm wide (that is, the diameter of the hole, not the diameter of the bead itself), though they can be as small as 2mm wide or as large as 12mm wide. They’re usually made with metal, stone, wood, acrylic, and even shells, but beads are also easily made with polymer clay.
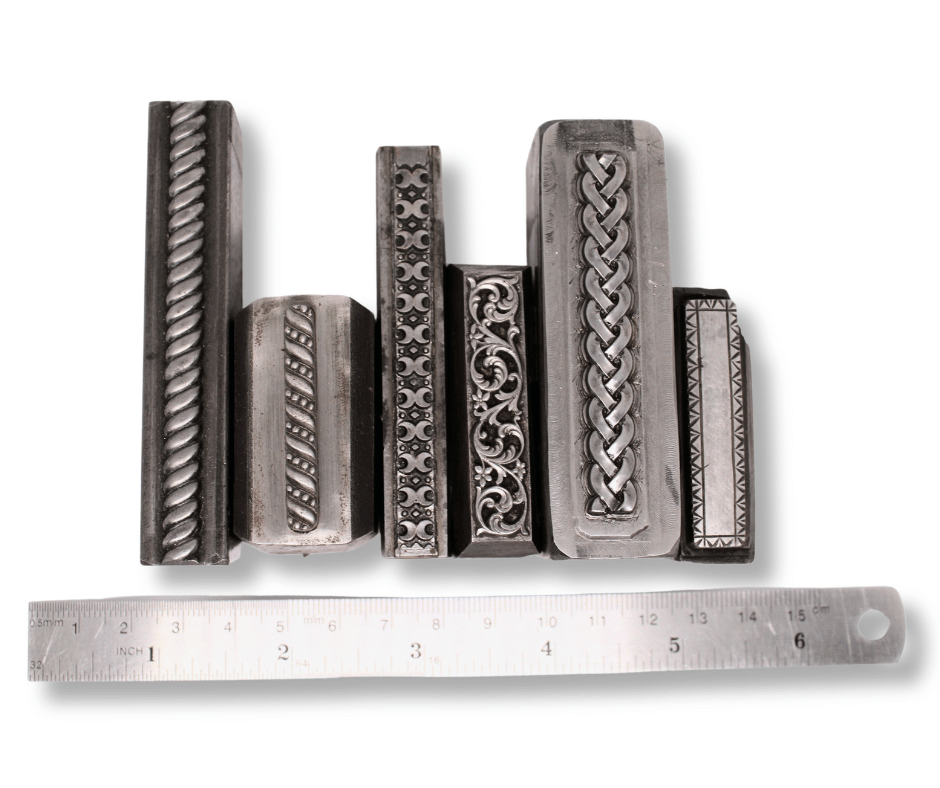
If you’re looking to make beads and cuffs from our tools, let’s talk about materials. You can make metal or polymer clay beads using our wire and impression dies. We would suggest using any of our 5mm to 20mm wide silver, brass, or copper patterned wire. If its historic impression dies you’re looking for, thicker ring bands of a consistent pattern or small beauty pins are the designs most easily translated to this purpose. We also have many impression dies that make beads of unique shapes and textures.
Bobby Pins
A bobby pin or hair grip is one of the simplest styles of hairpin. It’s a double-pronged clip, usually with a straight, firm prong and a wavy, more easily flexible prong that holds the hair between them. Their main purpose is to hold hair in place or to hold head coverings in place. They can be plain, and most often are, but we wouldn’t be talking about them if they didn’t have flamboyant potential. Some people even use them as bookmarks!
You can shape bobby pins with metal wire by flattening it in a rolling mill, bending it in half, and after adding whatever small to medium-sized embellishments to the wire that you’d like, you can bend a wavy formation on one side. One of our on-site jewelers, Lynette Andreasen, made this short video showing her process that you can use.
When choosing embellishments, your only major functional consideration is the weight of the pin. Small impression dies work best, but a thinner gauge of metal can do the trick if you’re wanting a more mid-sized design.
Decorative Combs
Combs are one of the oldest forms of hairpins just after the common hair stick, seen as early as 10,000 years ago. They had the same basic form and function as modern combs–fine-toothed or forked prongs, usually made of animal bone. For most of human history, hair combs have been simple and as unobtrusive as possible since they were used to pin a large amount of hair to the head, but decorative combs emerged as status symbols as early as 6,000 years ago in China. Decorative combs had a renaissance in the 18th and 19th centuries, particularly during the Victorian era.
In the Victorian era, most luxury combs were made from tortoise shell or ivory, some of the most expensive materials in the world at the time. These days, we all settle for plastic, but metal and gemstones add that precious component for the everyday, evening, and bridal looks that people long for.
When you get down to the nitty gritty, there’s really only two types of decorative comb: the multi-prong comb and the forked comb. As jewelers, you have the power to make all the necessary components yourself.
The forked comb is the easiest form to make, requiring only a decorative end and two prongs. Your best bet is to find an impression die with a design that is about ½” to 2” wide to accommodate the prongs. Any of our dies can spice up a forked comb, but you may be best served using an impression die that naturally flows into a forked design. Most of our dies are too small for a full-sized decorative comb, though we have hundreds that can make the handle of 2” to 3-½” combs. To make a full-sized comb, you can let your creativity run wild, combining whatever components you want to cover the end of your prongs.
Sticks
The hair stick is the simplest and oldest form of hair accessory, used pretty much everywhere. Even everyday objects like chopsticks or pencils are used as impromptu hair sticks. China alone has several names for different styles of hair sticks like zan (a single-pin hair stick), the chai (a forked or multi-pronged hair stick), the buyao (elaborate hair sticks with ornate dangling ends that literally ‘sway with each step’), and more! There’s even a number of hair sticks named for the thematic elements of their designs.
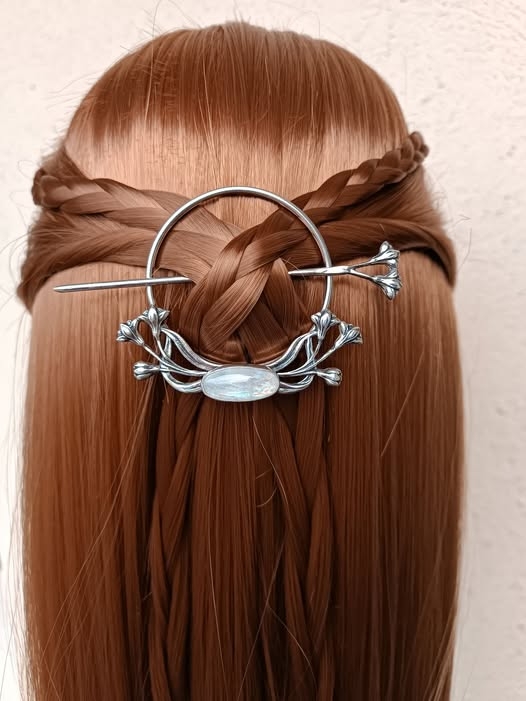
Most hair sticks are simple sticks used on their own or in a pair, but there are also some styles that involve a ring or “crown” of 2-½” to 5” in diameter that long hair can be pulled through, as well as incredible ornamental styles like the previously mentioned buyao.
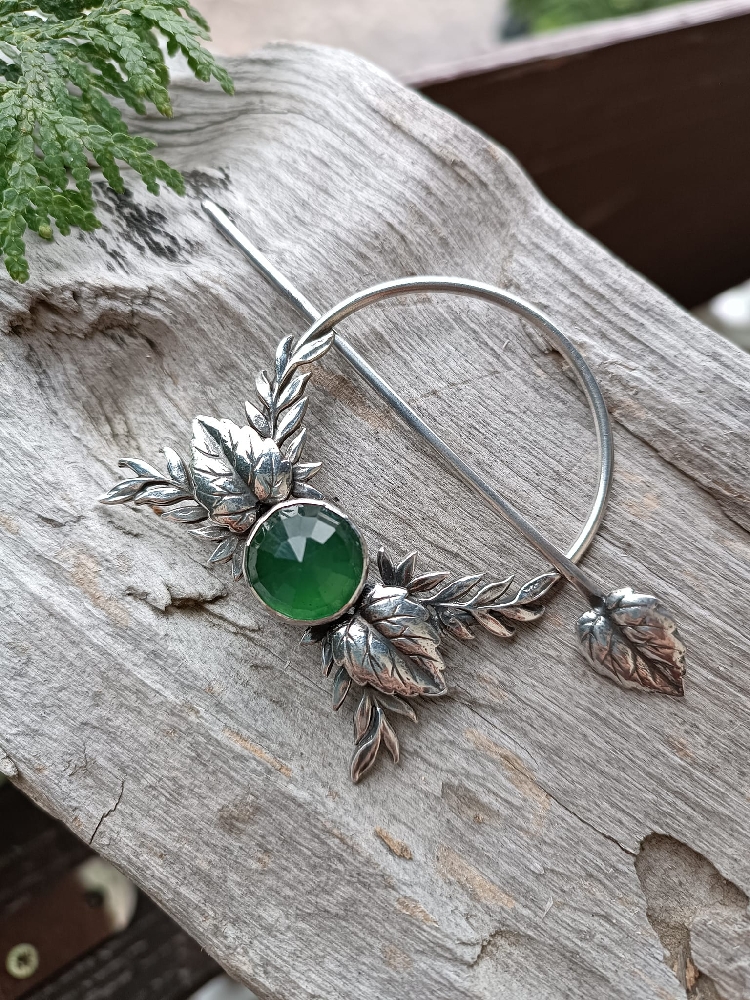
You can make a hair stick yourself with thick-gauge metal wire and any decorative elements you like. The sky is the limit when it comes to hair-sticks! If you’re looking for a simple design, decorative handles and small embellishments on the ends are easy to achieve and easy on the wallet. For two-pronged hair sticks, you’ll want to follow the same size rules as described in the section about hair combs. For hair sticks that sport elaborate or dangling components, you’ll want lightweight ornamentation and thin metal for any chains or jump rings you may need. For hairpins like those made by Potter USA customer Helena Ferletakova, you’ll want impression dies that can be cut into components that curve naturally around a large ring and small matching components for the hair stick itself.
Ponytail Covers
It is entirely unclear when the ponytail cover was invented, partially because hair ties themselves have existed just as long as we’ve known how to make rope, leather, or string. It’s known that the elastic hair tie wasn’t invented until the mid-19th century and that the scrunchie was only invented in the late 1980s, but the ponytail cover is far more nebulous. Any visual depictions of historical hair styling are assumed to have used a combination of hair ties, hair combs, and hair sticks, given that there is a veritable host of archaeological, textual, and artistic evidence of those objects in use. These ponytail covers, however, seem to be a small blindspot in the modern history of fashion. It's possible they’re an entirely modern invention, but we couldn’t find a definitive answer.
A ponytail cover is anatomically simple. The ornament sits over the top of a ponytail or braid, covering the tie from view. It’s usually a flat or slightly curved ornament of 1-½” to 2-½” inches that a hair tie, scrunchie, or ribbon has been looped through a hoop in the back of the cover. You can easily solder a hoop to the back of a stamping, as shown in this video by our resident jeweler, Annie Pennington.
The best kind of impression die for ponytail covers is a relatively flat, wide design. Piercework designs can look great as a ponytail cover, but remember to consider where you’ll be soldering the hoop in the back. You can use locket cases, knotwork, conchos, large floral arrangements, and more.
Written by Aeden Soland
References:
- “Artifact Corner: Victorian Hair Combs.” Kent-Delord House Museum, 2022, https://www.kentdelordhouse.org/artifact-corner-victorian-purses/
- Bianca, Josette. “A brief history of dreadlocks.” 2024, https://www.youtube.com/watch?v=tIy6znwp95Y
- “Hair comb.” University of Oxford, https://web.prm.ox.ac.uk/bodyarts/index.php/temporary-body-arts/hair/77-hair-comb-england-19th-century-.html
- “Hair Ornaments Culture — Chinese Hairpins, Crowns, and Other Decorations.” China Fetching, https://www.chinafetching.com/tradition-of-china-hair-ornament
- “The art of hair coloring–a history.” Journal of the American Academy of Dermatology, 2005, https://www.jaad.org/article/S0190-9622(04)02926-3/fulltext
- “Make Your Own Easy Loc Jewelry.” 2021, https://www.youtube.com/watch?v=U0WG0UXdsBQ
- “Venus Of Hohle Fels: The Earliest Known Depiction Of A Human Being In Prehistoric Art.” The Archaeologist, 2021, https://www.thearchaeologist.org/blog/venus-of-hohle-fels-the-earliest-known-depiction-of-a-human-being-in-prehistoric-art